

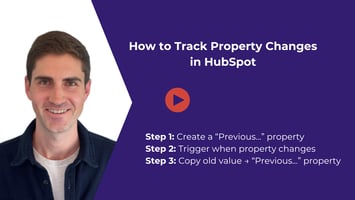
Overview This guide shows how to track property changes in HubSpot—specifically how to store and...
How I Automatically Emailed a Photo after Taking a Picture in the HubSpot App
Hi, I'm Ryan Schweighart, founder of Whole Hart Impact. In this post, I'll guide you through snapping a photo in the HubSpot app and sending it automatically via email using Zapier. We’ll use a cleaning company as our example.
Step-by-Step Guide
-
Snap the Photo
- Open the HubSpot app on your phone.
- Go to your cleaning pipeline and open the deal.
- Select "Add Note" and tap the camera icon.
- Take a photo of the clean home.
- Save the photo. This triggers the Zapier automation.
-
Set Up Zapier Automation
- Create a new Zap in Zapier.
- Trigger: Set it to trigger on a new engagement in HubSpot.
- Action: Use a custom webhook to fetch the photo via a URL.
- Email Setup: Configure Zapier to send an email via Gmail (or your email service). Customize the subject and body, and include the photo URL from step 2 as an attachment.
Detailed Steps for Zapier Setup
-
Trigger Setup
- In Zapier, choose "New Engagement" in HubSpot.
- Ensure the engagement type is "Note" and includes an image.
-
Webhook Configuration
- Use a custom webhook step in Zapier.
- Fetch the photo using the URL format:
https://api.hubspot.com/files/v3/files/{attachment_id}/signed-url. - Include authorization headers with your HubSpot private access token.
-
Email Configuration
- In Zapier, configure the email action step.
- Customize the recipient, subject, and body.
- Use the fetched photo URL as the email attachment.
Additional Tips
- Ensure your HubSpot private app has the necessary file scopes (
files.ui_hidden.readandfiles). - Test the Zap to ensure it works as expected.
- Customize the email with personalization tokens if needed.
This setup provides instant feedback to clients, showcasing the completed work and enhancing customer satisfaction. For any questions, feel free to comment below or reach out directly.
Bye for now!
